 |
| Short row knitting |
| Scroll down to see short row for Wave Wrap |
| I have a fabulous line up of events for 2023 |

Sydney Coal Loaders Artisan Market Sun March 5th
April 13th - 16th 2023
Winter 2023 AQC The Australian Quilt Convention returns to Carlton Garden and the Royal Exhibition Buildings. It's a wonderful show and Brisbane hosted this so well in April 2022.
April 29th - 30th 2023
Handmade Market Canberra award-winning quarterly market
|
| Shop @ Shopify & be inspired @ sigknit.com |
As I move across to the Shopify online store platform you can still visit sigknit.com which will continue as my design archive and allow you to order by card at @ sigknit.com or click to my Shopify site for card or Paypal. Patterns are still available on sigknit.com by clicking on a colourway or the rainbow colour band to purchase a pattern or kit.
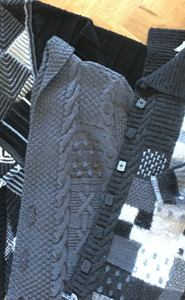
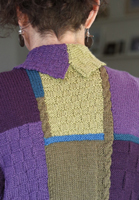
Below Blocks Cardigan in the ever popular Autumn tones.
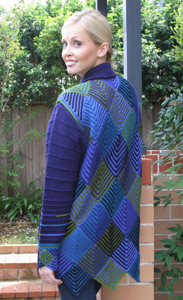
Centre Coco Shawl Aline Cardigan in Midnight, Jacaranda and Sequoia. |
   |
Signatur Handknits
Facebook/ Instagram
Email Jane at jane@sigknit.com
signatur-handknits.myshopify.com |
 |
|
Signatur Studio in Sydney 0427 064 834
Just give Jane a call and set a mutual time for a visit
|
.jpg) |
| Signatur Tech Talk - Short Rows |
Short rows have many and varied applications.
Let's take a look at hemlines and accessories using short rows. |
    |
| MORE and MORE on SHORT ROWS |
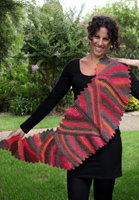
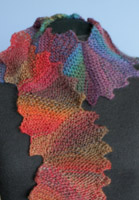
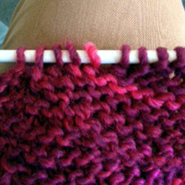
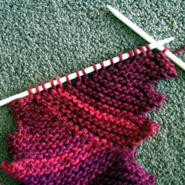
| The wave scarf (below right) is knitted with short rows. Short rows create wedges. I have knitted one left facing wedge, then 2 right facing wedges to give a horse-shoe shaped curve to the scarf. |
 Short rows are simply incomplete rows. They have so many uses, and there are so many methods you can choose to achieve similar results. Short rows are simply incomplete rows. They have so many uses, and there are so many methods you can choose to achieve similar results.
The images below will step you through short rows. If you want to pick up your needles and have a try, you can use any yarn and any needles. It's garter stitch knit all rows.
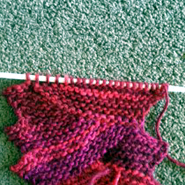
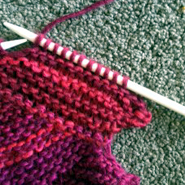
Cast on 17sts. Obviously the image below shows I am part-way through the scarf, having already worked several wedges. |
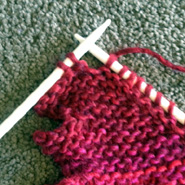   |
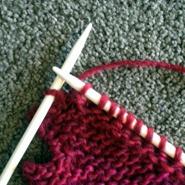
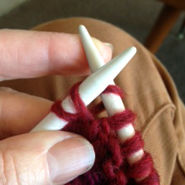
Above left: So with 17sts cast on work only 15sts for your first short row.
The piece is garter st so knit all rows so the yarn is at the back of the work.
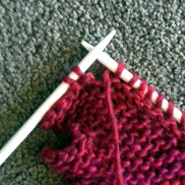
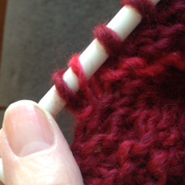
Above centre: Bring the yarn between the needles to the front of the knitting.
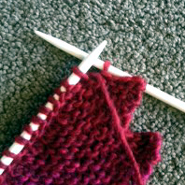
Above right: Slip next stitch left to right needle without working the stitch.
Below left: Take yarn back between needles (single unworked stitch on left needle).
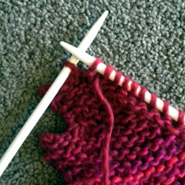
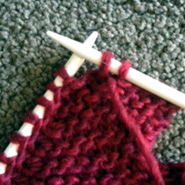
Below centre: Turn knitting to wrong side so the single unworked stitch is now on right needle.
Below right: Slip the next stitch left to right needle (same stitch previously slipped).
Take yarn between needles and knit to last stitch. |
   |
| Zig Zag edge of scarf is created by increasing stitches at the end of the wrongside row - a full row. When we cast the increase stitch off we create the points of the zig zag. |
   |
Work wrongside row (full row) until 1 stitch remains unworked.
Above left: Pick up the yarn from between the stitches of the previous row. Can you see how large this loop can be pulled leaving a hole?
Above centre: Knit through the back of the loop for a firm stitch, no hole.
Above right: Increase stitch completed, knit last stitch of row. |
| Short Row in Summary |
 Row 1: K15 left 2sts unworked - we slipped and wrapped the 16th stitch, the 17th stitch was unworked on left needle. Row 1: K15 left 2sts unworked - we slipped and wrapped the 16th stitch, the 17th stitch was unworked on left needle.
Row 2: Knit to the last stitch, M1 = make 1sts, K1 = 18sts.
Repeat Row 1: K15sts - as we have 18sts this will leave 3sts unworked - wrap and slip the next stitch - so 2sts unworked.
Row 4: As row 2 knit to last stitch M1, K1 = 19sts.
Repeat twice more = 21sts - this means you have worked 4 short rows and 4 increases. |
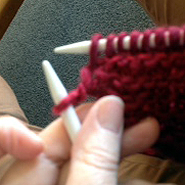
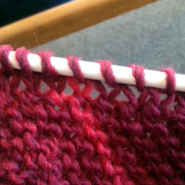
| Beginning of next short row cast off 4sts (Below left). K11 (instead of 15sts). (below centre). At this point it's really good to look at the stitches over the row. Can you tell which stitches have been wrapped? You'll learn so much simply by looking at the knitting, make fewer mistakes and when you do make a mistake find fixing it so much easier! |
   |
Repeat short rows and increases. After next 4sts cast off K7 to next wrap stitch.
Complete 3rd cast off 4sts (right centre). Continue row after cast off, K4, the next 11sts have wrap at base of each slipped stitch.
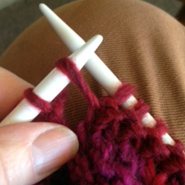
The slip stitch and the wrap below need to be knitted as one stitch.
Left below: With point of right needle pick up the wrap at base of stitch, then knit the stitch, shown centre. Lift the wrap (brighter stitch on right needle) over knit stitch.
Below right: This has been knitted without knitting the wrap and the stitch so there are holes / elongated stitches.
Above right: You can see how, when the wrap and the stitch are knitted together, there are no holes along each section of the wedge. |
   |
| How do I find Signatur patterns on the website? |
| The easiest way to find which patterns are available is to go to the horizontal navigation bar at the top of signknit.com and select Designs A-Z After you've found what you're looking for and want to order a pattern you must select a colour (the pattern option was added later on the site). You need to pick a colour for single colour designs by clicking on the rainbow. For multi colour designs simply click on a colourway. If you buy a pattern and decide at a later date you want the knitting kit the cost of the pattern is deducted from the price of your knitting kit. The knitting kit includes yarn and buttons. |
| Swing, Swagger, Drape is now a USB stick |
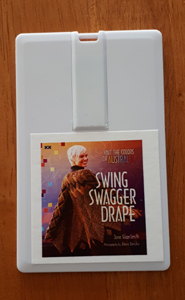  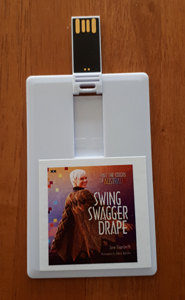
Out of print as a book!
NOW on a USB stick!
Simply slide into your computer, see every page of the book, print out just the pattern you need!
Perfectly packaged $25 |
| |
| Hope to see you soon! |
| If you'd like to discuss anything in this newsletter - or anything at all, please email Jane. Thanks for your support - Laura, Petra, Philippa, Cathryn, Helen, Margaret, Emily, Jacinta and I look forward to seeing you in the knitting circle! |
