| Techniques include colour work and textures, expands into garment shaping and fit. PLUS knitting classes. |
|
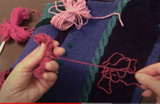
Bobbing Winding for Intarsia
click image below for
Youtube video |
 |
 |
| Knitting is cool again; knitting became a social activity with meetings in coffee shops and bars. Knitting styles and techniques come from many countries/ origins and therefore there are often several ways to achieve the same results. The more people you see knitting you will discover there are many ways of even holding the knitting needles.
Learning a new technique can be very frustrating. I hope this will help you understand these techniques. Googling a technique can sometime just add to the confusion, to an extend whatever works for you is right for you.
I love knitting with colour, even adding stripes to a garter stitch scarf makes the knitting more interesting, somehow it will seemingly grow faster too.
|
 |
 In my classes I teach techniques, taking my students into a new world of colours and stitches. Understanding techniques can open a whole new world. My world is full of colour and texture, like a great book, a journey. In my classes I teach techniques, taking my students into a new world of colours and stitches. Understanding techniques can open a whole new world. My world is full of colour and texture, like a great book, a journey.
This techniques page is a work in progress, I am adding classes and details, as I add new designs.
|
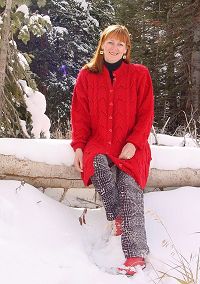
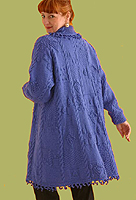
Tudor Swingcoat |
|
|
 |
Mitres |
Knitting Class - Mitres by design
This can be a 3 or 4 hour class and steps through a sample swatch from a basic mitre to half and quarter mitres. Increasing stitch to create A line shaping. Garment construction is also included, as there are many options. You find a link to my YouTube Mitre Knitting class on my home page. Mitre Knitting YouTube |
|
Coco Throw
in Wool & Mohair |
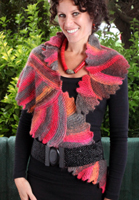
Mitres These are as fun as you can have with garter stitch stripes - I know you have to pick up stitches - but you are picking up along a straight edge, one stitch per stripe - so easy - so colourful. I use Mitres in many of my design, as a feature, a trim and all over.
Above: section from Coco Slub Jacket in seven colours including hand dyed slub.
Left: Coco Throw Mohair, ribbon & wool.
Right: Coco Panel Cardigan Wool. |
Coco Panel Cardigan
Pure New Wool |
| |
|
 |
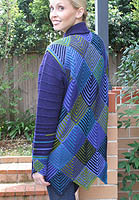
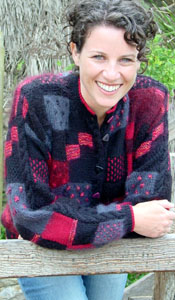
Intarsia |
Knitting class - Intarsia doesn't always have to be worked from a graph, as I demonstrated with designs in my book Swing, Swagger, Drape. Simple verticals stripes can be worked from a diagram, add colour changes to create blocks of colour.
Vertical stripes are best when the stripes start with a cast on per colour, so a swatch is worked staring with cast on in three colours. Once you understand the techniques of interlocking the stitches we advance onto reading a garph and understanding the techniques common the bith fairilse and intarsia. |
You may never want to knit something too demanding but the skills learnt in the class will allow you to add coloured cables to a basically plain design - great for childrens knits. |
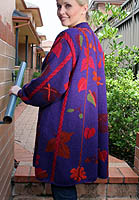
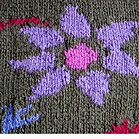
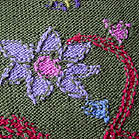
INTARSIA
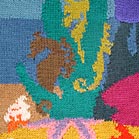
This technique is used for knitting pictures and is often called picture knitting. The simplest version of Intarsia would be a garment knitted in vertical stripes, using a ball of wool per colour, such as the Fantail Swingcoat.
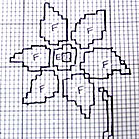
The Fantail Swing is knitted from a diagram and written instructions. However, most Intarsia is worked from a graph, with each square representing a stitch.
The difference between Fairisle and Intarsia? With Intarsia the yarn is worked from an individual ball or length of yarn, per area of colour. With fairisle the yarn is carried at the back of the work, side seam to side seam.
Graphs are essential for designs like the Times Cable Swing and picture designs as the Living Reef A Line coat.
|
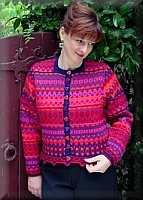
Tudor Swingcoat
colourway Passion |
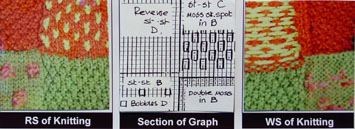
Desert Flower A line design.
Right: Wrong side of knitting.
Left: Right side of knitting.
Below: Graph each square represents a stitch.
|
 |
|
 An individaul length of yarn is used for each area of colour. I strongly recommend a class of Intarsia. An individaul length of yarn is used for each area of colour. I strongly recommend a class of Intarsia.
Choosing your first project is really important, the Living Reef has fine detail and 21 colours - try something with 4 to 6 colours as your first project.
|
|
| |
|
 |
Fairisle |
|
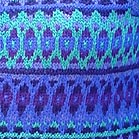
FAIRISLE
This is generally a pattern repeat worked in two colors across the full row, when you work in 1 colour the 2nd colour is carried at the WS - wrong side of the knitting, behind the colour in use. I call this carrying the yarn, it also referred to as stranding.
When carrying over more than 5 stitches the carried yarn is ‘woven in’ on the wrong side of the knitting. The Madras & Tiffany are the Fairisle designs presently in the range.
Generally the pattern repeat is worked from a graph, most Fairisle repeats are geometric and over 6 to 20 stitches. The term 'weaving in' refers to catching/trapping of the carried yarn into the wrong side of the knitting. I like to weave in every third to fifth stitch, this helps with elasticity in the knitting and practically stops these only strands being caught on finger nails and rings.
|
Madras Jacket |
| Some knitters weave in every second stitch: I find this creates a texture on the right side of the knitting. You should experiment and see which you achieve the best results with, this will be the method that works for you. Weaving the carried yarn also helps to even the tension, most knitters will find their stitch tension is reduced (firmer) when working fairisle, and the knitting will have less elasticity. |
|
Puckering occurs when you are pulling the carried yarn too tightly, almost like smocking the knitting. Try carrying the yarn looser.
Weaving in makes the knitting more like a fabric and thicker, as it's the combination of 2 yarns. For this reason I don't like to Fairisle with a yarn heavier than 8ply (22sts to 10cm/4").
Most important to keep the selvedges even, always weave in to the last stitch of the row. This will make sense when you work fairilse, when you turn for the next row both colours are at the start of your row. |
Fairisle Repeat
|
Fairisle Tension: Carrying and weaving yarn into the Fairisle changes the row and stitch tension. It should be used for a pattern that is worked side seam to side seam.
Don't use this fairisle carrying technique to work a motif on the chest of a garment. Working a Fairisle section over a motif on plain stocking stitch is one of the most difficult things to do. It is better to work a motif in Intarsia. |
|
| Short Row Shaping |
|
| |
|
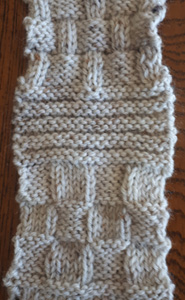
| CLASS: Swatch 1 Texture |
Knitting classes |
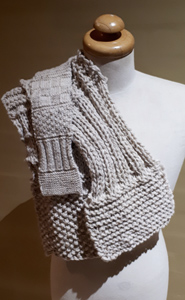 This class takes you from garter stitch to Basket Stitch, total of 7 stitch patterns over just 20sts with 18 rows per pattern. This class demonstrates how different stitch patterns change the tension of the knitting. This class takes you from garter stitch to Basket Stitch, total of 7 stitch patterns over just 20sts with 18 rows per pattern. This class demonstrates how different stitch patterns change the tension of the knitting.
The smaller swatch knitted on 4mm with about 30g of yarn.
Class Kit $30 with sufficient yarn to knit both the small sample and the chunky scarf.
Large scarf yarn double thickness on 10mm needles, same stitches and 18 rows per stitch pattern. |
 |
|
|
 |
Textures |
|
TEXTURED STITCHES 
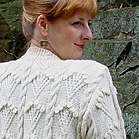
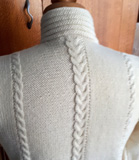
Cable and textured stitches have their origins in Scotland and Ireland. There is nothing more classic than a cream cable sweater; it has an architecture all of it's own. There are several techniques involved. From the basic cable to what I choose to call travelling stitches. I use cables in most of my designs for many reasons, which I will share later.
Right.Diamond Swing has traveling stitches which I have used to create diamonds.
|
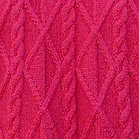
Diamond Cable Swingcoat
|
Cables require a CB - Cable Needle, this is a short double-pointed needle and stitches are put on this until they are to be knitted.
Cables are worked as vertical textured columns, worked over an even number of stitches, generally working 2 rows more than the stitch count between cable twists. A 6 stitch cable is twisted every 8th row. Twist by placing half the stitches (6sts = 3sts) onto the cable needle, take the CN to the back of the knitting and then K3 from left needle. Now bring the CN with our 3sts forawrd and knit the 3sts from the cable needle.
The 3sts have swopped positions, whilst maintaining the position of the 6sts on the needles. |
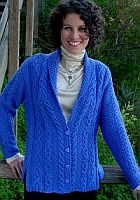
Fan & Cable Swingcoat  |
Knitting Class: Penny Jacket.
Class includes, cables, corrugated Garter and pocket insert. |
|
Penny Jacket knitting Class
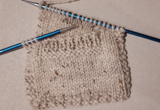
Class swatch is designed with all the skills to knit the Penny Jacket, including cables, Corrugated Garter - which is the mock rib for the buttonband. Second swatch steps you through knitting the inserted pocket as image (below).
 |
 |

Penny Jacket is simply stocking stitch and reverse stocking stitch divided by cables.
The Penny Jacket Class swatch has 4st cables and the Corrugated Garter, which is used for the button band. Two 4st cables are combined centre back and centre sleeve to create the 8st wheat sheaf cable. The side seams of the body each have a 4st cable. As you join the side seam you again have the wheat sheaf cable. Second swatch, as part of this class, includes a second swatch to work the pocket detail.
The classes all include additional explanatory details per design and all the reasons why I use these technquies as design elements.
Penny Jacket Class $10 which maybe redeemed against any knitting kit.
Also see Class 1 Texture above
Split Texture Class below |
 |
| Knitting Class: Split Texture Jacket |
|
Split Texture Class brings together the sttch patterns, short row shaping and knitted on rib band. Over 40 sts work all the stitches and patterns, understand all the elements to create the Split Texture Jacket.
Classes include the reasoning behind knitted on ribs, short row shaping and even buttonholes to try.
This can be sent as a pdf, or we can send a print copy with a free shade card.
|
 |
|
|
 |
Traveling |
|
 Travelling Stitches: Knit stitches (stocking stitch) worked on a base of Purl (reverse st-st). Using a CN - Cable Needle to move K2 across the Purl, stepping the K2 1 stitch to the right or 1 stitch to the left. This creates both zig-zag or diamond texture patterns. The knit stitches are moved on RS - right side rows. Travelling Stitches: Knit stitches (stocking stitch) worked on a base of Purl (reverse st-st). Using a CN - Cable Needle to move K2 across the Purl, stepping the K2 1 stitch to the right or 1 stitch to the left. This creates both zig-zag or diamond texture patterns. The knit stitches are moved on RS - right side rows.
The Knit traveling stitches are placed on the CN and held at the front of the knitting - the Purl is the background.
Written as C2R or C2L - Cross 2sts to the Right or to the Left.
C2L - place next 2 knit sts onto CN, hold at front, P1, then K2 from CN. The 2 knit sts have moved across to the left by 1 stitch.
C2R - place the next Purl st onto CN, hold at the back, K2, then P1 from CN. The 2 knit sts have moved to the right by 1 stitch.
|
Hamlet Swingcoat |
|
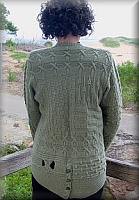
Shona Jacket |
Mastering the wrong side rows is sometimes a challenge. It is hard to visually define what is happening to the stitches on the wrong side of the knitting.
With this in mind, I designed the Celtic Cross stitch pattern, which I have used in several designs. The traveling stitches create an 'X' pattern. This is worked on garter stitch - Wrong side rows simply Purl all stitches.
Byron Coat
|
Split Texture Cardigan |
| |
|
| |
Lace |
|
LACE PATTERNS
These patterns are created by increasing or making stitches at the same time as decreasing, always maintaining the same number of stitches across the row.
Stitches are created by working a yrn – yarn round needle, as you knit the next stitch the yrn creates a stitch and a hole = lace. The next stitch maybe K2tog – in this was the stitches across the row are maintained, so think of these as a paired decrease/ increase.
The increase stitches create the lace open work. Lace is generally an all over pattern repeat, often with both written instructions and a graph. The graph will show only the repeat, which is knitted over the row/ full width of the garment. Lace can also be used as a motif pattern, as I have used in the Hamlet Swingcoat design.
|
|
| |
|
| |
Bobbles |
 TEXTURED PATTERNS TEXTURED PATTERNS
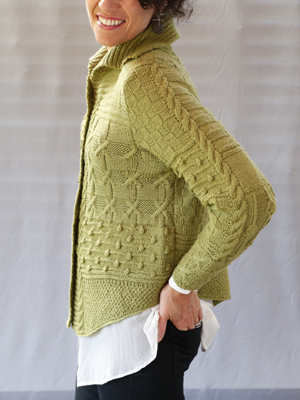
These are three dimensional stitch patterns, achieved by creating stitches. The best example is a bobble, the more stitches and more rows the larger the bobble. Bobbles feature in Fan & cable designs, Patchwork Jacket, also bobbles in contrast colours Blocks and Bee Bee Jacket.
A bobble is created by working 3 times into the same stitch. This can be worked by either knitting into the front and back of the stitch or by K1,P1,K1 into the one stitch. Then we turn to the wrong side and Purl these 3sts - like jogging on the spot. We then turn back to the right side and work a decrease sl1, K2tog, psso - slip 1 stitch from the left to the right needle without working the stitch. Knit the next 2sts together, then on the right hand needle pass the slip stitch over the K2tog. This leaves us with 1 stitch again, and original stitch count.
 |
Blocks Cardigan
 |
|
The Blocks Cardigan has lots of bobbles in Wool and Mohair. The pattern on this garment is worked in Intarsia, with a length of yarn per area of colour. However with the bobbles we are working 8 bobbles per pattern block. I use one length of yarn and carry this bobble to bobble across a row, then up to the next row of bobbles. This way I have two ends to sew in, instead of 16 ends (2 per bobble), also it is very difficult to put 2 end into the back of a bobble.
|
 |
| |
|
| |
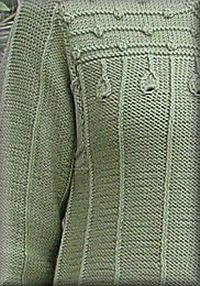
Bells |
|
 Other textures are created by increasing stitches for several rows, the increase stitches, the increased stitches are knit on Purl background, so the stitches/ pattern sit proud of the knitting creating a 3D pattern. Other textures are created by increasing stitches for several rows, the increase stitches, the increased stitches are knit on Purl background, so the stitches/ pattern sit proud of the knitting creating a 3D pattern.
This increases the number of stitches across the row. The pattern will then decrease stitches back to the original number. This is generally a stocking stitch motif on a reverse stocking stitch.
|
|
|
Bell Stitch We can get really three dimensional and create an embossed Bell shape in stocking stitch on reverse stocking.
Increase 1 stitch to 5 stitches, as with the bobble, but then continue along the row. Wrong side rows Purl these additional 5 stitches. Work maybe 3 rows then start to decrease on RS rows back to 1 stitch.
To keep the Bell shape symmetrical we decrease by working the first two sts and the last two stitches together. There are two different decreases for this, which keeps the shoulders of the bell looking alike: sl1, K1, psso, K1, K2tog = 3sts. These two methods of decrease position our stitches differently creating the shape of the Bell. The following right side sl1, K2tog, psso takes us back to 1stitch. I love the Bell shape, and have used it on the bodice of the Victoria Smock. On the cuff of this design I have added the extra stitches into the cast on edge, so the bells have formed a trim on the cuff.
|
Victoria Smock
 |
| |
|
| |
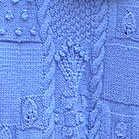
Leaf Lace |
|
LEAF LACE This combines making stitches to create lace, as well as the 3D effect. The leaf has a centre stitch, each side of the centre stitch we increase by yrn - Yarn Round Needle - so yrn, K1, yrn - so we have increased 2sts - one each side of our centre K1 - following WS (wrong side) row P3.
Next Rs row with 3sts: K1, yrn, centre K1, yrn, K1 - following WS P5. As we continue the Knit stitches before the yrn increase 1 stitch. Having worked 3 RS yrn increases you will have 6 increased stitches + the original centre Knit 1 - a total 7sts. These extra stitches create the 3D effect.
|
Swatch of Hamlet swing |
| The next RS row we start to decrease, the two methods we use create a different stitch shape to match the leaf shape. Slip the first st from the left to the right needle without working the stitch. Knit the next stitch, then pass the slip st over the K1 just worked = sl1, K1, psso, then K3 centre of the leaf, second decrease K2tog - this decreases 1 stitch each on the outside edge of the leaf shape = 5sts. These 2 different decrease techniques result in both edges of the leaf having the same appearance. Following RS row centre will be sl1, K1, psso, K1, K2tog. The last decrease - 3sts remain - sl1, K2tog, psso. This takes us back to 1 stitch. |
|
|
The trickiest part of working any texture, where we are moving or creating stitches, is wrong side rows. Wrong side rows rarely have any increase or decreases therefore you just have to maintain stocking stitch or reverse stocking stitch as the right side of the knitting.
|
|
|
|
|
Fit & Style
|
FIT & STYLE CLASS |
In dress making you learn to adapt patterns, increase or lower a dart, make your armhole a little deeper - customise your pattern.
When I design for a finished garment I work these elements into my design, so I can make to measure combining chest of one size with the armhole depth of another - then the sleeve head needs adjusting. If I didn't offer this I would certainly sell far less finished garments, which has been the core of my business for the first 30 years.
The first element I apply with many of my designs is to create a shape that flatters the body, namely swingcoats and A line coats. I avoid drop shoulders at all costs, using a half drop instead.
Many elements go together to achieve the style. I have created a class which is designed to help you understand the elements involved and how you can apply this to your body shape - indeed your measurements.
Unlike dress making we are knitting a stretch fabric, which requires no darts, unless we are looking at a fitted piece. Having an understanding of dress making is certainly an advantage.
Since I am firstly designing for finished garments I am free from the restrictions placed on designs created for leaflet publication - so, I can have 3 large graphs if I wish and added diagrams.
Tension and correct yarn. Undertsanding your body measurements in relation to the knitted garment/ pattern.
Style - this is about the garment design, how a simple cardigan pattern can be tweaked to achieve a better fit for you.
TENSION - wicked little swatches some of us will knit ten and worry - since those ladies have done all the work some of us shrug and just start knitting without swatching.
Whatever path you choose, simply check as you progress. If you are the knit and see type - try knitting the sleeve first! Once you have knitted about 4"/10cm of the main pattern - you should be able to measure your knitting and if you are to size.
I was recently lecturing on Fit, style and fabric and comparing knitting and dressmaking. A dressamker cuts the fabric - there is no turning back! So everytime you rip out your knitting think of it as a bonus. |
This class can format into 3 to 4 hours, or when time permits into a full day. This class is suitable for any level of knitter, giving you concepts you maybe never really applied to your handknitting before.
Understand the elements involved in achieving a correctly fitted garment.
Have you ever thought that you don't match the designers sizes?
Sometimes we think we have done something wrong when we simply need to compare the garment measurements to our own measurements.
Obviously it doesn't take long to realise everytime you knit something that the sleeves are long.
The aim is to understand the elements involved in achieving a correctly fitted garment, as without the correct fit you will not achieve the style desired, they go hand in hand.
|
| |
|
| |
Tension |
TENSION If your tension is too firm, you will get a smaller garment. Too loose will result in a larger garment. To correct your tension, change your needle size.
I always knit with a size smaller than the pattern requires as I have a loose tension. Therefore I use 3.75mm needles instead of 4mm.
If your reverse stocking stitch forms into 2 rows ridges, you are knitting or purling looser, to remedy this change 1 needle to a smaller needle. If you change the wrong needle, you will make the problem worse. If you change the right needle you have fixed the problem – you want to be relaxed knitting, not thinking – this is a purl row I must work firmer. |
|
| How can we be so patient as to knit a whole garment, yet we don't knit a tension swatch? If in doubt I recommend you knit the sleeve first: this will allow you to check the tension over a larger number of stitches. So if you require 22.5 stitches to 10cm - measure over 40cm. You should have 90 stitches (40cm x 2.25 = 90sts). If you have more stitches to 40cm you will have a smaller garment than the pattern. If you have fewer stitches your garment will be larger. |
|
| |
|
| |
Check Size |
CHECK CHEST SIZE FROM SLEEVE This works best on a plain stocking stitch garment. Knit the sleeve first, press so you're getting a true measurement. Now measure across half the number of stitches you will be knitting for the back of the garment.
So if the back is 120 stitches, measure over 60 stitches. To measure, lay the sleeve on a table knit-side up. Place a dressmaker's pin between the 2 V's formed by the knit stitch at the top of the sleeve. Then count 60 stitches - V's, across the top of the sleeve and mark with a second pin. Now measure between the pins. Multiply this measurement by 4 = the total chest measurement of your tension will achieve. Depending upon the fit and the weight of the yarn this should be at least 1” large than your chest and up to 6” or even 8” for a loose fitting garment. |
|
| |
|
| |
Skill Levels |
SKILL LEVELS I hate to put anybody off knitting something because they think it is too complicated for them. To me an Intarsia design is like a great book, while plain one colour stocking stitch is like a dripping tap. Step out into texture and color- even stripes make the knitting more satisfying, as your knitting will seem to grow faster.
In my Signatur Knitting Kit range there few no one-color stocking stitch designs. This range is aimed at more experienced knitters. With new knitters in mind, I have created designs like the Boxes Kimono, the Boxes Stepped Capelet, and Boxes Vee Shawl, which takes new knitters from stocking stitch to basket stitch. This requires counting stitches and rows. For color work I have introduced designs using Mitres. These are great fun, generally a two row stripe in garter stitch.
Just remember: if you can't master a technique you only need showing. Knitting groups are setting up all over the country and everybody is more than welcome. Yarn stores often hold knitting classes and I believe that if you purchase from a store, then they should be happy to help you on the garment. |
|
| |
|
| |
Sleeves |
| SQUARE SET IN SLEEVE I do use this a lot. It started with my geometric designs, like the Tibet Cardigan. My logic was a pattern made of blocks of colour looks better with a square armhole. There is still some shaping in the sleeve head. My patterns give a diagram of how to sew this in. The open top of the sleeve seam sews to the cast off edge of the armhole. Then the shaped sleeve head is sewn ONLY to the vertical edge of the armhole. |
|
| |
|
| |
Picking Up |
| PICKING UP STITCHES The Mitre pattern designs teaches you the pick up technique. See Coco Cardigan, Mitre Vee Capelet & Mitre Trim Capelet or the Coco Capelet I love these mitres so the range will keep growing. YouTube Mitre Knitting |
|
|
In these designs I find using a double pointed needle in a smaller size to pick up stitch (loops from the right side of the knitting) without actually knitting them. This allows you to check your pick up is even, count the stitches and see if more or less are needed. With Mitres it is really easy picking up from the striped edge of the mitre – simply a stitch per stripe.
|
|
|
I also use this technique when picking up a neckline, using a circular needle. Pick up the loops from the knitting, count the loops, if you have too many you can knit two loops together. If you need more stitches you can spread the stitches out and see where you might have gaps where you can pick up extra stitches.
|
|
| |
|
| |
Neckbands |
|
Necklines can be daunting, often you are taking stitches from a stitch holder; picking up from a cast off stepped edge which is uneven, then up the side of the neck from a straight edge. Picking up and knitting at the same time it can be hard to achieve the correct number of stitches. By picking up loops with the circular needle, when you join the yarn and knit you can make the adjustment to stitch numbers. Don’t try to pick up too close to the edge of the knitting as cast off decreases can show, it is better to be picking up slightly onto the right side of the knitting.
|
|
| |
|
| |
Classes |
|
Intarsia & Fairisle starting with simple vertical stripes then advancing onto more intricate patterns and fairisle. The basic are very simple, again it is about following a graph and preparing yarn placement for the row ahead. I use garments from my range to show talk about skill levels, combining of Intarsia and fairisle and colour proportions. Techniques for achieving the best results include - Joining in a new colour, securing ends, carrying colours and how to cheat!
|
The Metro Coat is Intarsia - Cast on in blocks of colour and knit vertical colums of colour from a diagram. Once you learn the basic of interlocking, or twisting the colours at the joins you are very quickly seeing the results. Learn to master tangling yarns and then to follow a graph. |
|
Fit & Style - full day class: This is great for any level of knitter, as it is about fitting to your body shape, unlike most knitting patterns which are straight up and down. I have being teaching this by commencing with the students knitting swatches, as home work then in the class we take body measurements. Ease and fit relates to the individual, so each student will work from their own body measurement, add ease, and calculate stitches, body length and fit. I use garments from my range demonstrate fit, style and ease, also pattern and colour.
|
| Mitres these are one of the most rewarding yet simple techniques. I have taken mitres from Capes and Caplets to A line Jackets and coats, skirts and dress coats. Most recently into panels within designs and as cuff trims. Garments are created virtually seamlessly, by picking up along a garter stitch edge, and working the next mitre. |
| Texture working from a graph to created stitch patterns from bobbles and bells to traveling stitches. The class asks the students to observe what is created by differing increase and decrease techniques, to create three dimensional textures. Traveling stitches have a simple logic, which when you understand the sequence will free you from following row by row instructions. |
|
| Finishing the importance of pressing you garment pieces. From structural seams for shoulders, seam allowance on sleeve heads, picking up stitches for bands. Explore buttonhole techniques and what works for you and sewing on button bands. Sewing in ends with a stretch to stretch with the garment. This can be an afternoon class after either Mitres or Texture. |
| |
|
| |
Stores |
| SUPPORT YOUR LOCAL STORE Please always support your local yarn store. In Australia many larger stores are selling cheap copy yarns. They have no pattern support and can put the local store - with their knowledge and support, out of business. |
|
